
How to build a technical-writers media board using Sanity CMS.
Building full-stack projects with lightweight backend requirements using content management systems


Introduction
Building websites or even an online presence for your company or business has gotten easier over the years with the introduction of Content Management Systems (CMS).
As the name implies, a Content Management System or CMS is software that allows users to create, edit, and maintain the content on a website without needing specialized knowledge.
In simpler terms, a content management system (CMS) enables you to create a website without the need to learn how to code or even write any original code.
Types of Content Management System (CMS)
There are two types of content management systems that I’ll briefly explain below.
Traditional Content Management Systems or Traditional CMS:
The presentation layer is a component of the CMS in this architecture. This implies that in addition to storing, updating, and managing material, the CMS is also in charge of displaying the content to the user. Software like WordPress and Wix demonstrate this.
Headless Content Management Systems or Headless CMS:
This kind of CMS functions as backend-as-a-service software. In other words, the display layer is distinct and only controls the content. Any display client you want can then receive this content using a RESTful API or GraphQL API.
The user or developer can utilize any frontend framework or technology they are most comfortable with.
Use cases for Content Management System (CMS)
Websites
E-commerce stores
Blogs
Portfolios
The use case for Content management systems is vast and not limited to the functions listed above.
What is Sanity CMS?
Sanity is a headless Content Management System or Headless CMS that delivers content anywhere. The sanity website describes the software as “A fully decoupled, real-time content back end.”
Sanity allows users to upload content (data) via its graphical user interface (GUI), called Studio, or manually via API post requests to the sanity client.
GRoQ requests can now be made to the sanity client to fetch, update, edit, or delete data stored in the sanity database.
What is GROQ?
GROQ (Graph-Relational Object Queries) is a GraphQL-like query language built by Sanity to structure requests made to the sanity client. This makes it easier to provide the necessary information, combining data from various documents to create specialized answers with the precise fields you need.
In this article, we’ll look at the basics of Sanity and explore the use of GROQ requests to fetch data from Sanity. We will also explore using Sanity Studio to add, edit, and maintain data in the sanity client. (Let’s go)
Setup project folder structure
Name your new directory "folder-name" when you create it. Any name you choose can be used in place of "folder-name." In my case, I'll call it a blog tutorial (I know it's cliche).
Launch the terminal and type the following command in the root directory:
npx create-next-app@latest ./ --ts
When you execute this command, the following prompt appears:
√ Would you like to use ESLint? ... No / Yes
√ Would you like to use Tailwind CSS? ... No / Yes
√ Would you like to use src/ directory? ... No / Yes
√ Would you like to use App Router? (recommended) ... No / Yes
√ Would you like to customize the default import alias? ... No / Yes
√ What import alias would you like configured? ... @/*
Simply select yes for everything. (easy right?!).
reason?:
We want to use Eslint to maintain best practices, we also use Tailwind CSS to style our components.
The src/ folder will organize our folder structure better and the new app router is recommended for Nextjs 13.
That being said let's proceed to install our dependencies.
Installing dependencies
We will make use of @react-oauth/google for authentication and react-hook-form for form management. We also use Zustand for state management.
To install these packages run the following command in the root directory of the terminal:
npm install @react-oauth/google react-hook-form jwt-decode zustand
Create Zustand Store
Create a folder called "store" in the src/ folder's root. Make a file called index.ts within the store folder, and paste the code from the below example into it.
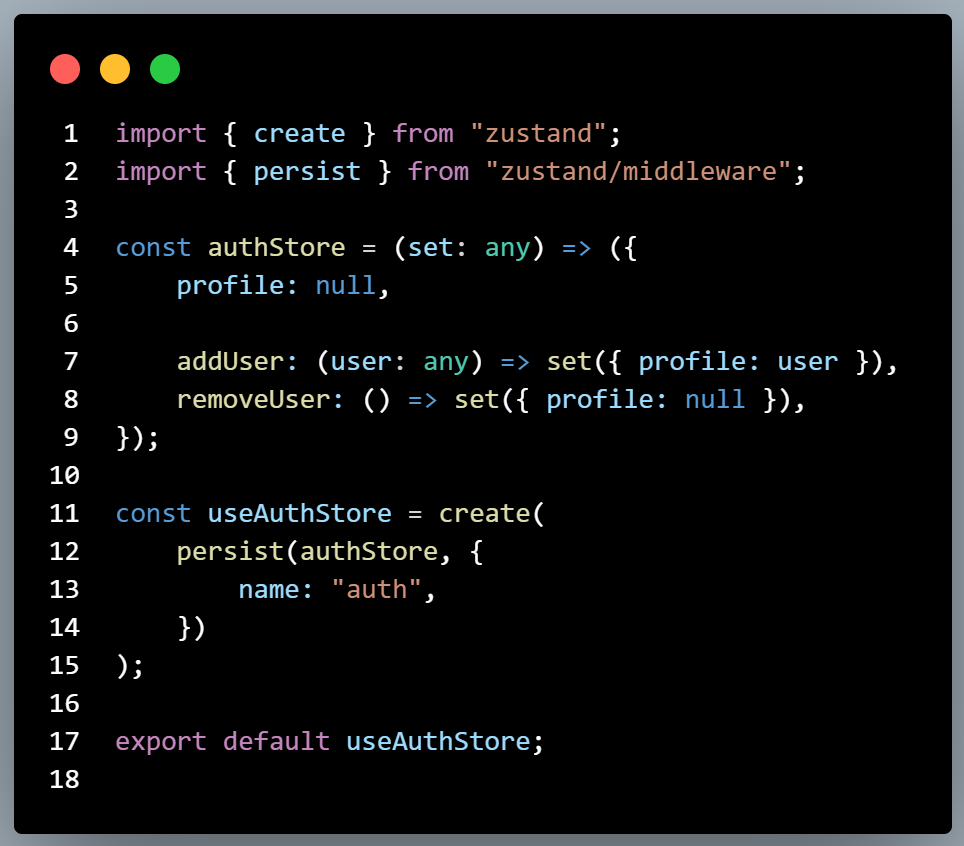
As seen above, we create a function called authstore which has a set function used in merging the state states of objects declared within the function.
The profile object is initialized and set to null.
The ‘addUser’ function receives a user prop and updates the state of the profile with the value of the user.
The ‘removeUser’ function resets the profile to a null state.
Setting up the Sanity Client
In the terminal, run the following command npm create sanity@latest
You will redirected to log in with your browser. Create an account if you’re new to Sanity, or sign in if you already have an existing account.
Upon successful login, you are redirected to your terminal and then presented with a prompt similar to what is shown below:
Create new project
Select “create a new project”.
Give the project a name and follow the instructions below in answering the prompt:
? Your project name: <your_project_name> in my case ‘blog’
Your content will be stored in a dataset that can be public or private, depending on
whether you want to query your content with or without authentication.
The default dataset configuration has a public dataset named "production".
? Use the default dataset configuration? Yes
√ Creating dataset
? Would you like to add configuration files for a Sanity project in this Next.js folder? Yes
? Do you want to use TypeScript? Yes
? Would you like an embedded Sanity Studio? Yes
? Would you like to use the Next.js app directory for routes? No
? What route do you want to use for the Studio? /admin
? Select project template to use Clean project with no predefined schemas
? Would you like to add the project ID and dataset to your .env file? Yes
After answering the prompt, Sanity will install the necessary dependencies to your project. It will also add an embedded route to manage your project (in our case we’ve defined that route to be /admin).
Go ahead and replace the page.tsx file in the src/app folder with the code below:
import React, { FC } from 'react'


interface HomeProps {


}


const Home: FC<HomeProps> = ({  }) => {
  return (
    <div>
     Home
    </div>
  )
}


export default Home;
Now run “npm run dev” inside of the terminal. You can now see your project live on the development server.
You can also go to http://localhost:3000/admin to view your sanity studio.
Configure sanity client
After launching Sanity Studio, we need to add a few configurations to the Sanity client to ensure it works properly.
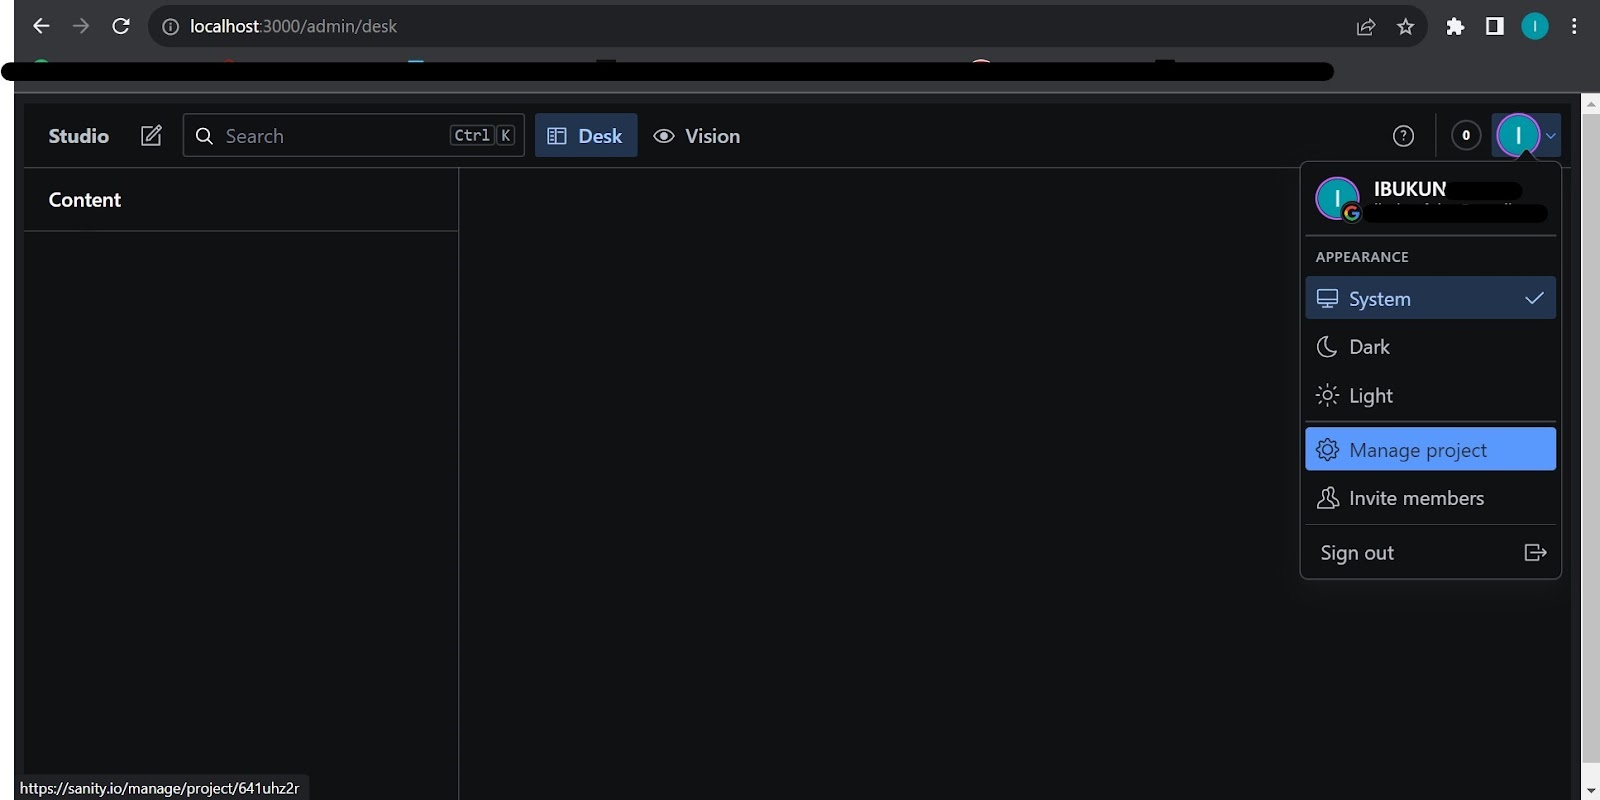
Click on the icon at the top right of the sidebar
Click on ‘manage project’.
This will take you to the project overview page on the sanity client.
Click on the API tab.
Scroll down to Cors origin and click on Add CORS origin
Add this URL ‘http://localhost:3000’ to the address bar, select accept credentials, and hit save.
Scroll down further to the Token section and in a similar fashion click on the add API Token button
Enter the name for your token… in my case ‘development’
Select editor and hit save.
A token is generated, copy this token to your environment variable.

Adding the token to the client
In the root of your directory, go to the sanity folder, and in the env.ts file, add the following block of code
export const token = assertValue(
    process.env.NEXT_PUBLIC_SANITY_TOKEN,
    "Missing environment variable: process.env.NEXT_PUBLIC_SANITY_TOKEN"
);
After adding the token to the sanity client, in the same file update the useCdn value to true
export const useCdn = true;
Now go to the /lib folder in the same directory and the client.ts file, add the token to the ‘createClient’ object
import { createClient } from "next-sanity";


import { apiVersion, dataset, projectId, useCdn, token } from "../env";


export const client = createClient({
    apiVersion,
    dataset,
    projectId,
    useCdn,
    token,
});
Build sanity schema
Every backend requires a schema. Which is a document structure for which data will be created, stored, and maintained on the backend.
Creating a schema is the easiest thing to do, it just requires a few lines of code or dare I say ‘english’.
Yeah, English! Not literally, but because the structure is easily understood by anyone reading it. Take a look at the example below:

Now in the root of the sanity folder, create a folder and name it schema.
Inside the schema folder, create the following files:
Index.ts
User.ts
Post.ts
Copy the following code into the user.ts file
const user = {
    name: "user",
    title: "User",
    type: "document",
    fields: [
        {
            name: "name",
            title: "Name",
            type: "string",
        },
        {
            name: "email",
            title: "Email",
            type: "string",
        },
        {
            name: "image",
            title: "Image",
            type: "string",
        },
    ],
};


export default user;
Do the same for the post.ts file
const post = {
    name: "post",
    title: "Post",
    type: "document",
    fields: [
        {
            name: "title",
            title: "Title",
            type: "string",
        },
        {
            name: "description",
            title: "Description",
            type: "string",
        },
        {
            name: "url",
            title: "Url",
            type: "string",
        },
        {
            name: "postedBy",
            title: "PostedBy",
            type: "reference",
            to: [{ type: "user" }],
        },
    ],
};


export default post;
In the index.ts file, add the following code:
import { type SchemaTypeDefinition } from 'sanity'
import user from './user'
import post from './post'


export const schema: { types: SchemaTypeDefinition[] } = {
  types: [user,post],
}
The reason why the index file is essential is that it collects all other schemas into an array and sends them as a single file to the sanity client.
This means that any schema that is not imported into the index file and added to the array will not be visible on the sanity studio.
Manually adding data to sanity
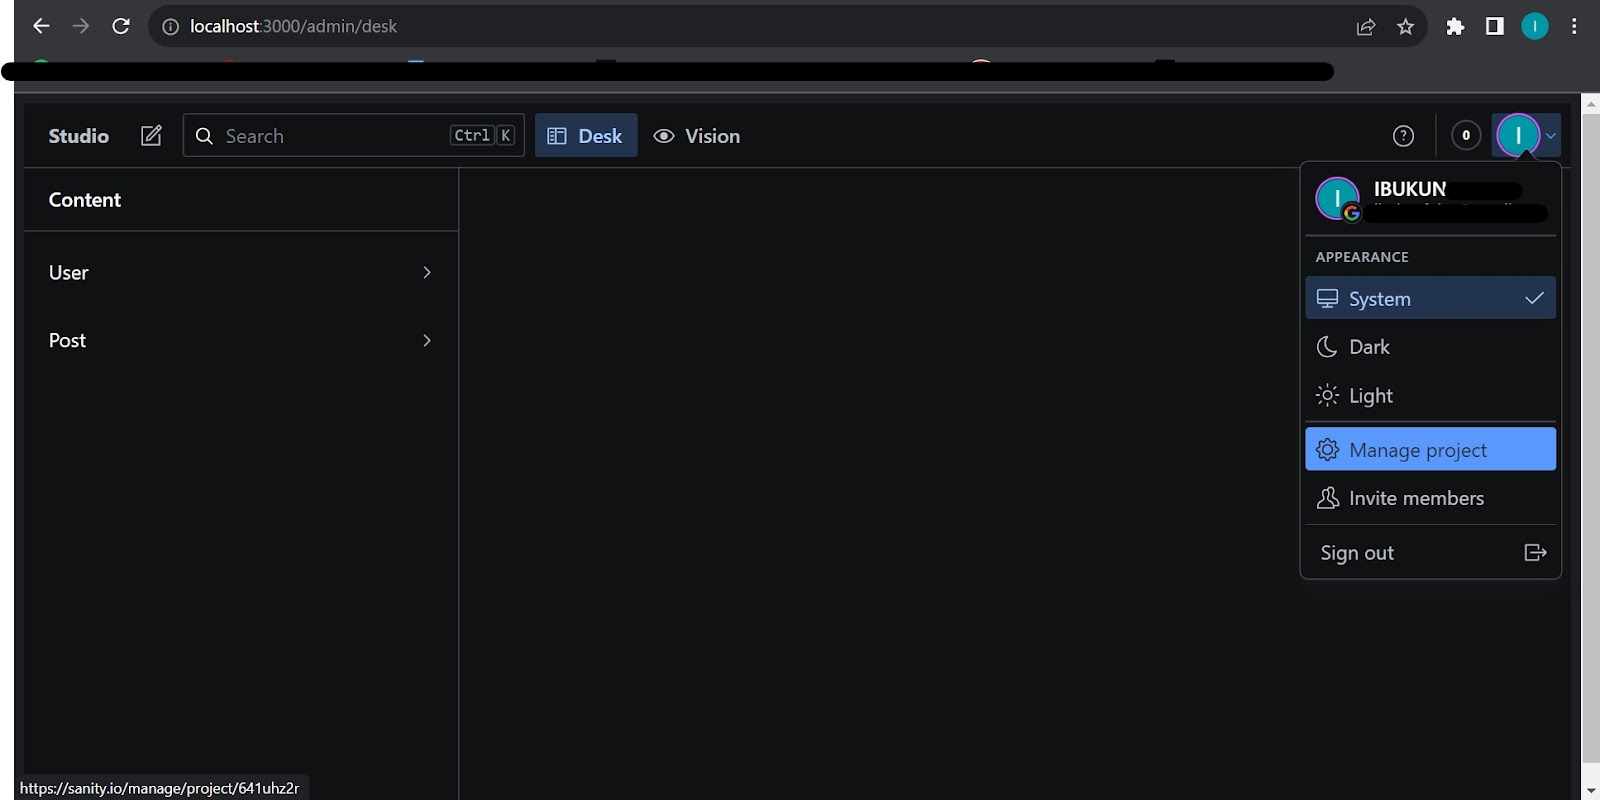
Sanity’s being a CMS allows manual input of data into its backend. So in each of these schemas, you can create a new document by tapping the edit icon and inputting dummy data.

Once we have data in our CMS, the next thing to do is to fetch this data to the client. In Sanity, this is done using GROQ requests.
Creating a GROQ request
Below is an example of a GROQ query that gets all posts from the sanity client:

We can then call this query function inside any page and then display the result in the Nextjs client. To learn more about how Groq requests work, click here.
Setup Google Auth
For authentication, we will use the @react-oauth/google library. For this to work, we need to set up Google authentication in the Google Cloud Console.
Upon completing the process, a Google client id and client secret are generated which will be saved to the .env file.
Follow the steps below carefully, to set up Google OAuth:
Click this link to go to the Google Cloud console.
Click on ‘Select a project’

On the pop-up modal select ‘New Project’
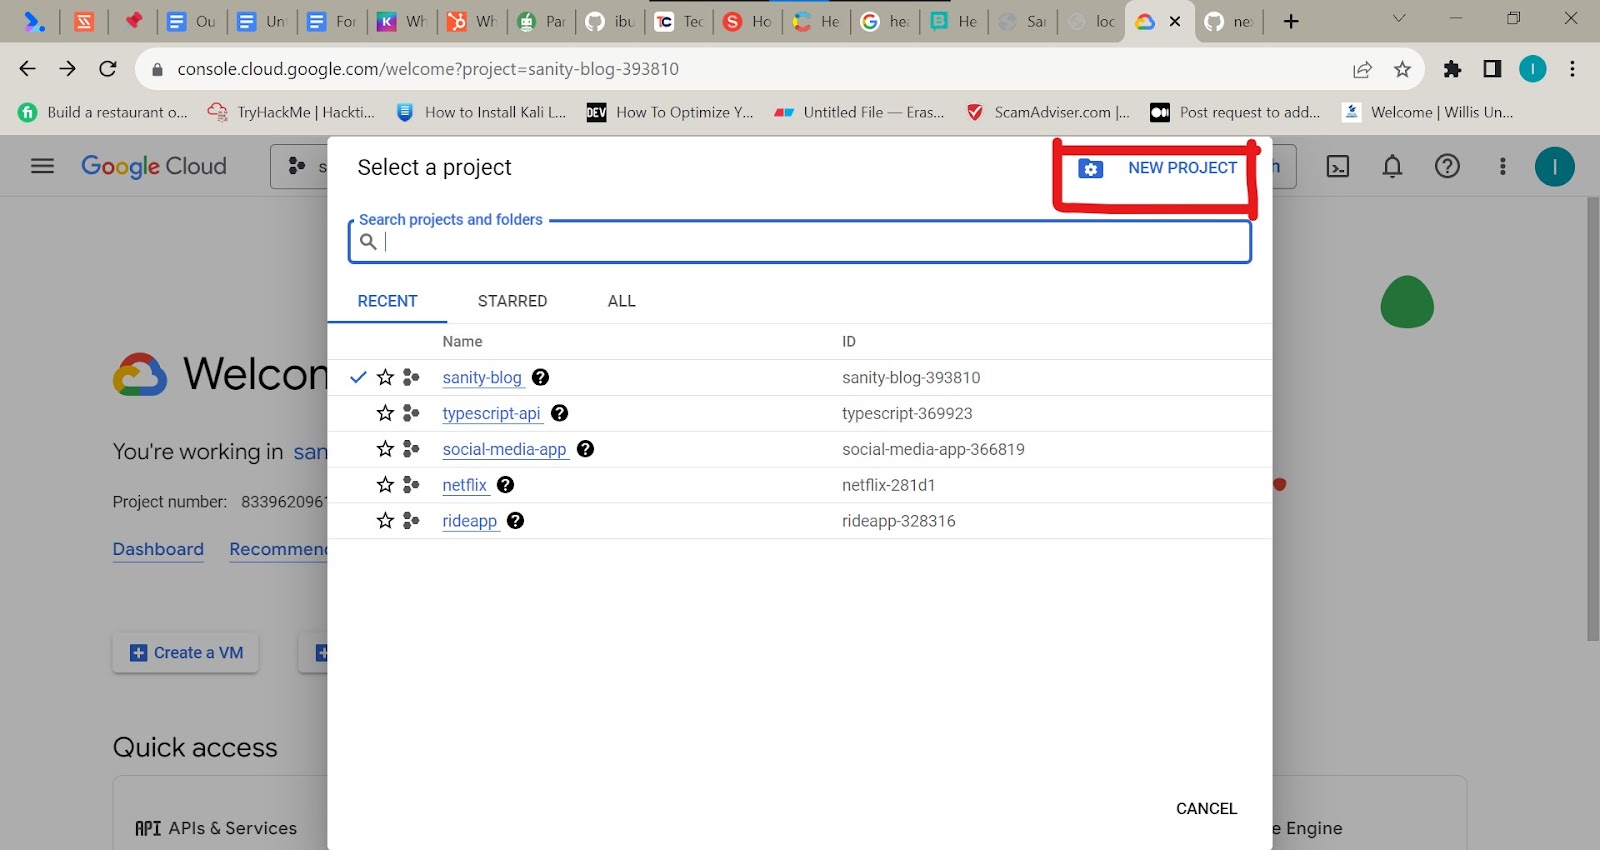
Enter the name of your project. In my case ‘blog-tutorial’.

You’ll be taken to a dashboard that looks like what is shown below.

Follow the steps in the gif below to set up the OAuth consent screen:

After setting up the consent screen, click on credentials and follow the steps in the gif below to get the client ID and secret.

Upon successful creation, you'll be presented with the Google client ID and the client secret.
Copy these and paste them into your .env file
Create Context Provider
To implement Google Oauth, we need to create a provider and wrap our the next app with this provider.
In the root of the src/ folder, create a context folder, and inside of this directory create an index.tsx file and paste the following code inside.
'use client'


import { GoogleOAuthProvider } from '@react-oauth/google';


export default function Providers ({ children}:any){


    return (
      <GoogleOAuthProvider clientId={`${process.env.NEXT_PUBLIC_GOOGLE_CLIENT_ID}`}>
        {children}
    </GoogleOAuthProvider>
    )


}
Add providers to the layout page
In the layout.tsx file in the src/app directory, wrap the children object within the <body> tag with the provider
import Providers from '@/context';


      <body className={inter.className} suppressHydrationWarning>
      <Providers>
          {children}
      </Providers>
      </body>
Create user service
Google Auth will deliver a response object with a token and a credential after a successful login attempt. The credential token contains the crucial information we require to generate the user object for Sanity and to obtain it, we must utilize the 'jwt-decode' library.
Make a services folder in the library folder, add a file called index.ts, and then add the following code.
import jwtDecode from "jwt-decode";
import { client } from "../../../sanity/lib/client";

export const createUserSession = async (credential: any, addUser: any) => {
    const decoded: { name: string; picture: string; sub: string; email: string } =
        jwtDecode(credential);

    const { name, picture, sub, email } = decoded;

    const user = {
        _id: sub,
        _type: "user",
        name: name,
        email: email,
        image: picture,
    };

    addUser(user);

    await client.createIfNotExists(user);
};
Create App Components
In the src/ folder, create a components folder and the following subfolders:
Buttons
Inputs
Navbar
Footer
Preview
Inside these folders, create the files shown below inside the respective folders, and copy the code snippets into the respective files.
If you don’t want to write the code afresh, you can get the source code on my GitHub repository here
Buttons Folder
Index.tsx file
'use client'


import React, { memo } from 'react'
import Link from 'next/link';
import { GoogleLogin, googleLogout } from '@react-oauth/google';
import { createUserSession } from '@/lib/services';
import useAuthStore from '@/store';


const AuthButton = () => {

  const {addUser, removeUser, profile} = useAuthStore()

  if(profile){

    return (
      <div>
            <button type='submit' className='w-full shadow-md h-full dark:bg-zinc-800/30 dark:from-inherit bg--black pb-6 pt-8 lg:p-4 rounded-lg' onClick={()=>{
              googleLogout()
              removeUser()
            }}>Log out</button>
        </div>
      )
  }


  return (

<GoogleLogin
onSuccess={(res) => {
  createUserSession(res.credential, addUser)
}}
onError={() => {
  console.log('Login Failed');
}}
/>
    )
}


const SubmitButton = () => {
    return (
      <div>
          <button type='submit' className='w-full shadow-md h-full dark:bg-zinc-800/30 dark:from-inherit bg--black pb-6 pt-8 lg:p-4 rounded-lg'>Submit</button>
      </div>
    )
}


const UploadButton = () => {


  const {profile} = useAuthStore()


  if(profile){

    return (
      <Link href='/upload'>
            <button type='button' className='w-full shadow-md h-full dark:bg-zinc-800/30 dark:from-inherit bg--black pb-6 pt-8 lg:p-4 rounded-lg'>Upload</button>
        </Link>
      )
  }
}


const UploadBtn = memo(UploadButton)
const SubmitBtn = memo(SubmitButton)
const AuthBtn = memo(AuthButton)


export { SubmitBtn, AuthBtn, UploadBtn };
In this file, we define three button components as seen above. The AuthButton displays the Google login button from @oauth/react-google when the profile value is set to null in the store and a log-out button when the profile value is not null.
The submit button is a re-useable component in submitting forms.
The upload button displays only when the user is logged in and is a link to the upload page.
Inputs Folder
TextInput.tsx file
import React from 'react'


const TextInput = ({placeholder, type, name, register }: {placeholder: string, type: string, name: string, register:any}) => {

    return (
          <input type={type} placeholder={placeholder}  {...register(name)} className='w-full h-full border-b border-gray-300 bg-gradient-to-b from-zinc-200 py-4 backdrop-blur-2xl dark:border-neutral-800 dark:bg-zinc-800/30 dark:from-inherit  lg:rounded-xl lg:border lg:bg-gray-200 lg:dark:bg-zinc-800/30 px-3 outline-none'/>
    )
  }
export default TextInput
Navbar Folder
Index.tsx file
"use client"
import React, { memo } from 'react'
import { AuthBtn, UploadBtn } from '../buttons'

const Navbar = () => {

  return (
    <div className='flex w-full shadow-md justify-between p-4 border border-red-300 border-solid items-center'>
      <div className="flex justify-start"><h2 className="font-bold text-2xl">Tech Blog</h2></div>
      <div className="flex justify-end space-x-4"><UploadBtn/> <AuthBtn/></div>
    </div>
  )
}

export default memo(Navbar)
Footer folder
Index.tsx file
import React, { FC, memo } from 'react'
interface FooterProps {
}
const Footer: FC<FooterProps> = ({ }) => {
return (
<div className='shadow-md w-full flex justify-center items-center min-h-[5em]'>© Tech writers blog 2021.</div>
)
}
export default memo(Footer);
Preview Folder
Index.tsx file
'use client'
import Image from 'next/image'
import Link from 'next/link'
import React, { FC,memo } from 'react'

interface PreviewProps {
  post: any
}

const Preview: FC<PreviewProps> = ({ post }) => {
const date = new Date(post._createdAt).toDateString()


  return (
           <Link href={`${post.url}`}>
           <div className='w-full shadow-lg overflow-hidden border border-gray-200 border-solid rounded-md '>
           <Image width={500} height={200} priority src="https://images.pexels.com/photos/262508/pexels-photo-262508.jpeg?auto=compress&cs=tinysrgb&w=1260&h=750&dpr=2" alt="preview" />
           <div className="p-2">
           <h2 className='font-bold text-lg truncate'>{post.title}</h2>
           <h4 className='truncate'>{post.description}</h4>
           <div className='text-xs font-extralight grid'>
            <span className="">Author: {post.postedBy.name}</span>
            <span className="">Date: {date}</span>
           </div>
           </div>
    </div>
    </Link>
  )
}

export default memo(Preview);
After creating the components, we need to add the navbar and footer components to the layout.
The final layout.tsx file will be something like this:
import Navbar from '@/components/navbar'
import './globals.css'
import type { Metadata } from 'next'
import { Inter } from 'next/font/google'
import Footer from '@/components/footer';
import Providers from '@/context';


const inter = Inter({ subsets: ['latin'] })


export const metadata: Metadata = {
  title: 'Sanity Blog',
  description: 'Nextjs Blog with Sanity CMS',
}


export default async function RootLayout({
  children,
}: {
  children: React.ReactNode
}) {


  return (
    <html lang="en">
      <body className={inter.className} suppressHydrationWarning>
      <Providers>
        <Navbar/>
          {children}
        <Footer/>
      </Providers>
      </body>
    </html>
  )
}
Homepage
Copy the code below into the page.tsx file, in the src/app directory.
'use client'
import Preview from '@/components/preview';
import { getAllPosts } from '@/lib/queries';
import React, { FC, useEffect, useState } from 'react'


interface HomeProps {

}


const Home: FC<HomeProps> = () => {


  const [posts, setPosts] = useState([])

  useEffect(() => {
    async function getPosts(){
      const res = await getAllPosts()
      setPosts(res)
    }
    getPosts()
  }, [])

  return (
    <div className='p-4 grid grid-cols-1 md:grid-cols-2 lg:grid-cols-3 gap-4'>
     {posts.map((post: any, i: any)=>(
      <Preview post={post} key={i}/>
     ))}
    </div>
  )
}

export default Home;
Upload page
'use client'


import { TextInput } from '@/components/Inputs';
import { SubmitBtn } from '@/components/buttons';
import React, { FC } from 'react'
import { useForm } from 'react-hook-form';
import { client } from '../../../sanity/lib/client';
import useAuthStore from '@/store';
import { useRouter } from 'next/navigation';

interface UploadProps {}

interface UploadInputs {
    url: string
    title: string
    description: string
}

const Upload: FC<UploadProps> = ({  }) => {


  const router = useRouter()
  const {profile}: any = useAuthStore()
    const { register,handleSubmit, formState: {errors}} = useForm<UploadInputs>({})

  const Submit = async(data: any) => {


    console.log(data)
  }

  return (
    <div className='flex my-10 justify-center items-center min-h-[100vh]'>
        <form onSubmit={handleSubmit((data)=>Submit(data))} className="group w-full lg:w-2/5 space-y-8 rounded-lg border border-transparent px-5 py-8 transition-colors border-gray-300 bg-gray-100 dark:border-neutral-700 dark:bg-neutral-800/30">
            <h2 className="font-inter text-2xl font-bold leading-3 text-center ">Create new post</h2>
            <div className="space-y-4">
            <TextInput placeholder='Title' type='text' name='title' register={register}/>
            {errors.title && <p>title is required</p>}
            <TextInput placeholder='Description' type='text' name='description' register={register}/>
            {errors.description && <p>enter a description</p>}
            <TextInput placeholder='URL' type='url' name='url' register={register}/>
            {errors.url && <p>url cannot be empty</p>}
            </div>
            <SubmitBtn />
        </form>
    </div>
  )
}

export default Upload;
In the upload page, we create a small form component implementing react-hook-form in handling the form management.
This is what it looks like in the UI looks like when we run the server.

After you click submit, we can see the data in the console.
We want to send the data as a post object to sanity because displaying data in the console is not recommended.
Replace the console.log line in the submit function with the code below
import {useRouter} from 'next/navigation'

const router = useRouter()

const post = {...data, postedBy: { _type: 'postedBy', _ref: profile._id}, _type: 'post' }
     await client.create(post)

    router.push('/')
Before using the 'client.create()' method to submit the content to sanity, we add the following things to the post object:
const post = {...data, postedBy: { _type: 'postedBy', _ref: profile._id}, _type: 'post' }
If we go back to the post structure, we see that before the post object can be pushed to sanity, a postedBy value is needed. The id of the currently logged-in user is indicated by this value for the 'postedBy' attribute. A _type object is also included, indicating the type of document that will be generated.
We enter these values inside the post object, send the information to the sanity client, and then navigate back to the home page.

And just like that, we’ve created a working blog using Sanity CMS.
Easy! Peasy!! 😀!!!!
Conclusion
In this post, we've talked about content management systems and some of the ways they're used, using Sanity CMS as an illustration. However, using sanity is not just for creating blogs and online portfolios. In your personal use case, be sure that you explore the options and push the boundaries of sanity.
Happy coding!